ST-Link hardware has become a host for various debuggers, including J-Link and Versaloon (which no longer seems to be maintained). To be honest, I was so spoiled by J-Link that I never had the necessity to try different debugging hardware. Only recently I have discovered the Black Magic Probe which, according to Hackaday, is the best ARM JTAG debugger.
Installing BMP firmware on ST-Link presents a few obstacles: you need a second programmer to flash the on-board ST-Link on Discovery boards and clones from China require some soldering. The sad part is that in both cases you loose the original firmware.
The purpose of this article is to achieve the following goals:
- Port BMP firmware to native ST-Link bootloader
- Make the firmware available for both ST-Link v2 and v2-1
Changing application start address
Native ST-Link bootloader loads the firmware at address 0x08004000. Black Magic Probe bootloader is more compact and loads the firmware at offset 0x2000, which allows extra 8k of flash to be used by the firmware. In order to make the program compatible with ST-Link bootloader, we need to adjust the start address first.
BMP firmware is built on top of libopencm3 and is well organized. Changing the application start address is a bit tricky though, since it’s hard-coded in many places. First of all, we alter the linker script and set ROM length to 128k. We also need to set SCB_VTOR to 0x4000 in stlink/platform.c so that the interrupt vector table is relocated in the right place. Another issue arises due to the fact that ST-Link bootloader leaves USB peripheral initialized when jumping to the main application. We need the host to re-enumerate our device, hence we reset the USB peripheral and pull D+ pin low:
1 | void platform_init(void) |
Now we are ready to compile the firmware.
1 | $ make PROBE_HOST=stlink |
Finally, we need to encrypt the firmware with st-derypt utility and replace the binary inside the updater archive. Here’s a quick bash script that does all the steps for you:
1 |
|
From this point if we use ST-Link v2-1 with a 128k microcontroller, we’re good to go. However, the resulting binary is too large to fit inside a 64k part. Initially I was trying to get the size down by compiling with various optimizations enabled, but I just couldn’t get the binary small enough.
Luckily, Paul Fertser from OpenOCD project reminded me that most F103C8 parts usually have twice as much flash as they should. It’s common practice among silicon manufacturers: high-end parts that did not fully pass electrical testing and quality control are sold as lower end parts. In fact, ST-Link clones from China take full advantage of this ‘feature’: most 3$ dongles are using STM32F101 which doesn’t even have USB peripheral.
Knowing all that, let’s try flashing ST-Link v2 with our firmware.

Patching the updater
I couldn’t just write a post about compiling BMP sources, so I decided to describe patching Java bytecode in more detail. I’m pretty sure there are various tools out there that would achieve the same result much easier, but I’m going to stick with standard utilities from Java Development Kit for the most part.
A .jar package is simply a zip archive which contains a manifest and a bunch of other stuff. Compiled Java bytecode is located inside .class files. It’s kind of like assembly but for the virtual machine. To decompile a binary we use javap utility from JDK.
1 | $ javap -c ./stlinkupgrade/core/c.class > c_bytecode.java |
Doing a quick search reveals the text string we’re interested in:
1 | 498: isub // 0x64 |
I’ve written hex representation of some of the opcodes on the right, see bytecode instructions list for more details.
Now if we search for pattern 64 85 94 9E and patch ifle (0x9E) -> ifne (0x9A), we shall get past the flash size check.
That’s not enough though. If we update the firmware now, it will be corrupt (although it will work to some extent). To figure out what’s going on let’s take a look at one of the firmware dumps I’ve taken previously:
1 | 0x0000ffc0: ff ff ff ff ff ff ff ff ff ff ff ff ff ff ff ff ................ |
As you can see there, is some sort of ‘EOF’ record written at address 0xFFFC. Luckily, it is written by the updater and not the bootloader itself. This was too fiddly to analyze in plain bytecode, so I used Procyon decompiler to produce readable code from compiled binary. Going through the same file (core/c.class) reveals the following line:
1 | final long n5 = 134217728 + (this.p << 10) - 4; |
134217728 is 0x8000000, which is flash memory base address.
We can assume that this.p field is the flash size: 134217728 + (64 << 10) - 4 = 0x800FFFC. This is exactly where ‘EOF’ is written. Our objective is to make the updater always think we have 128k of flash. Now back to the bytecode.
1 | 661: ldc #2 // int 134217728 |
Instruction getfield #142 needs to be patched into sipush 128. NOP aload_0 to keep the stack consistent. We search for pattern 10 0A 78 60 and replace preceding 4 bytes with 00 11 00 80.
That was plain straight-forward patching. But it works. If we wanted to do things the right way, then we should have altered GetDeviceInfo() function and make it always think that our device has 128k of flash.
Exiting DFU mode
There is a slight issue: each time you plug in ST-Link it starts in DFU mode. This could be quite annoying when using Black Magic Probe firmware.
The easiest workaround is to execute any program that issues dfu_exit() once the device is attached. We can deal with it by creating a udev rule or each time manually executing a command like reading chip ID, flash, etc.
1 | # /etc/udev/rules.d/99-stlink.rules |
If everything was done properly, you should get similar dmesg output:
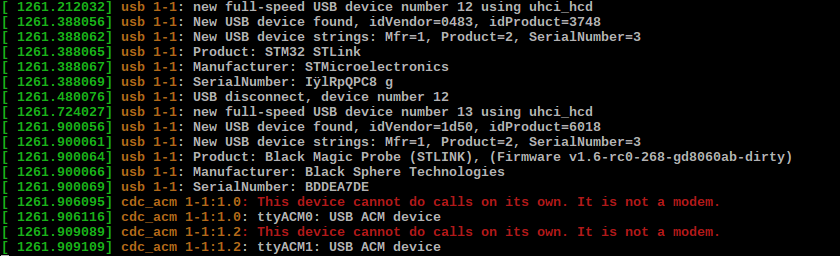
I used st-info from texane/stlink. Make sure you provide the full path to the utility in the udev rule. If you ever need to enter DFU mode again, just remove the RUN part and reload udev rules.
The Segger way
You might be wondering how Segger deals with this issue in their J-Link firmware. The answer is quite simple: they patch the bootloader. I kid you not, they literary erase a bootloader page at address 0x2400 and insert some code that branches to 0x4000. Basically, this renders the bootloader useless and relies on the firmware and ‘reflash’ utility to recover the erased page when needed. At least it’s good to know that I’m not the only one patching ST’s bootloader..
Conclusion
We have a way of installing BMP firmware without destroying ST-Link bootloader - mission accomplished. That being said, patching the updater utility is definitely not the most elegant solution to the problem. ST’s DFU protocol could be easily reverse-engineered, but I couldn’t invest more time in it. Besides, installing the firmware on ST-Link v2-1 does not require any patching and should be pretty straight-forward. Overall, I think it’s a nice way of trying out Black Magic firmware.
As always, code is on github, including precompiled firmware binary.